Many battles were fought during World War II. It may sound strange, but for that very reason, I have hardly discussed any of them, except for a few exceptions. One battle more or less was just business as usual. As I already mentioned in my introduction, I only want to highlight the extraordinary events.
In my blog “Strange decisions that made a difference,” I already mentioned some strange and often poor strategic decisions. Operation Market-Garden was also referenced there.
Because this operation was a series of strategic blunders by the Allies – standing out far above other operations -, I will delve deeper into it here. After reading this blog, only one conclusion is possible: even a complete novice in warfare would never have made all these mistakes. How could this have happened?
The Netherlands
In the Netherlands, various rivers and canals often run from east to west. The route to be followed from Eindhoven to Arnhem, 120 km long, began in the south and ran northward. The area was entirely in German hands. Therefore, many rivers and canals had to be crossed. English readers are possibly not familiar with The Netherlands. In the story below several cities and villages are mentioned. Eindhoven, Nijmegen and Arnhem are big cities, Grave, Heumen, Best, Son, Groesbeek, Heelsum, Wolfheeze, Sint-Oedenrode, Veghel, Uden, Nunspeet, Doesburg, Zutphen, Deventer, Venlo, Eerde, Nuenen, Niftrik, Oosterbeek, Mook, Dinther, Heeswijk, Schijndel, Mariaheide and Koevering, are larger cities or larger and smaller villages next to or close to the route from Eindhoven tot Arnhem. Lommel is located in Belgium. The Rijn, Nederrijn, Waal and Maas are big rivers, the others mentioned are smaller rivers or canals.
The main allied players in Montgomery’s plan
The British XXX Corps, led by Brian Horrocks, was located in northern Belgium at the start of the operation and was expected to reach Arnhem within three days with a massive convoy of vehicles and infantry via a narrow road.
The US 101st Airborne Division, under Maxwell Taylor, was tasked with securing several bridges between Eindhoven and Veghel. The route of Horrocks’ convoy had to continue over these bridges.
The US 82nd Airborne Division, led by James Gavin, had a similar task: securing the bridges between Grave and Nijmegen for Horrocks’ convoy.
The British 1st Airborne Division, commanded by Roy Urquhart, was ordered to seize the bridges over the Lower Rhine at Arnhem.
The Polish 1st Independant Parachute Brigade was to support the British at Oosterbeek near Arnhem, from the south bank of the Lower Rhine.
The Normandy Landings
Montgomery wanted to land at Calais, the shortest route from England to the continent. The Americans had a different idea, and Montgomery was overruled. The landings took place in Normandy. This was just one of many events in which Patton played a significant role. Montgomery and Patton were not exactly friends and had already clashed several times. When Montgomery presented the plan for Market-Garden to Eisenhower, Eisenhower was initially not in favor. However, Montgomery’s claim that this plan could drastically shorten the war led Eisenhower to reluctantly agree (maybe as compensation for Normandy). All American generals were against this plan and they were right.
Antwerp
Pip Roberts, with his British 11th Armoured Division, the Black Bulls, arrived in Antwerp on September 4, and the city fell almost without a fight into Allied hands. The problem, however, was that Antwerp lay 75 km upstream from the mouth of the Scheldt. To gain access to the port of Antwerp, both banks of Walcheren and Zeeuws-Vlaanderen had to be captured from the Germans. Pip Roberts therefore wanted to push through to Walcheren as quickly as possible, as the German occupying force there was limited at the time and certainly not prepared for battle. Gustav von Zangen, with his 15th Army of 100,000 men, was still encircled near the Channel coast and the Flemish coast and could therefore not play a significant role.
It was thus an ideal moment to liberate Antwerp for the delivery of the much-needed supplies for the Allies, instead of the long route from the beaches of Normandy, the Red Ball Express, to the north.
Pip Roberts, however, received the order not to turn left but to proceed right along the Albert Canal. Montgomery has had his approval from Eisenhower and wanted to start executing his plan as soon as possible.
Montgomery’s Plan
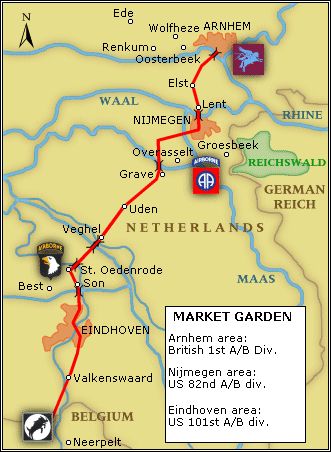
The Allied airborne divisions had to land around Eindhoven, Arnhem and Nijmegen and clear the way for the XXX Corps, which would advance from the south. The ultimate goal was the bridge at Arnhem. Once that was in Allied hands, it would be easy (according to Montgomery) to turn right and enter Germany, pushing on to Berlin. Montgomery thus assumed that the main German front had already been defeated.
Strategic Error 1 – The capture of the Scheldt banks should have taken priority
Market-Garden should never have been approved. Antwerp should have been made available as a priority for the delivery of the much-needed supplies for the advancing armies, which were now far from the Normandy beaches. It would have significantly simplified the logistical problem.
Strategic Error 2 – Serious underestimation of the strength of the remaining German army
Montgomery believed that the German units near Arnhem and along the route to Arnhem were second-rate, exhausted German troops who would offer little resistance. In reality, Wilhelm Bittrich, Walter Harzer, Kurt Student, and Walter Model were present with the II SS Panzer Corps and the 9th SS Panzer Division, men hardened in battle and tactically very capable of making the right decisions to stop the attacks.
If you consider that Hitler was assembling his army for the Ardennes Offensive (Wacht am Rhein) at the same time, it is clear that Montgomery’s assessment was completely off the mark.
Through several reconnaissance flights over the area around Arnhem, the Allied high command was aware of the presence of armored troops, and the resistance had repeatedly reported their presence. The Americans were happy to work with the resistance, but the British attached less value to their input and ignored their information. Montgomery thus seriously underestimated the strength of the German units present.
Execution of the Plan
It is difficult to recount all the events as briefly and concisely as possible without getting bogged down in too many details. Yet, I will have to provide some details.
Operation Market
Operation Market was the codename for the air landing plan, as already described above.
Strategic Error 3 – The dropping of paratroopers had to be divided over several days due to a lack of sufficient aircraft, thus completely eliminating the element of surprise
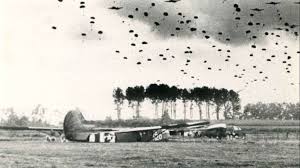
On September 17, the first troops were ready in England for the start of the action. The total air fleet consisted of 1,073 transport aircraft and 500 gliders, escorted by 1,500 fighter aircraft. After two hours, 20,000 men, 511 vehicles, 330 artillery pieces, and 590 tons of supplies were in the air.
During the drop near Eindhoven by the 101st Airborne Division, sixteen Dakotas were shot down and more than a hundred were damaged. Of the seventy gliders, 53 reached their destination. Maxwell Taylor still considered the landing a great success.
The 501st Parachute Infantry Regiment (PIR) had captured the bridges over the Aa river and the Zuid-Willemsvaart within two hours. The idea of capturing an additional bridge over the Wilhelminakanaal at Best did not succeed.
The 504th PIR landed near Grave. The Grave bridge was captured undamaged after a short but fierce battle. The bridge at Heumen over the Maas-Waalkanaal was also captured undamaged later.
The 506th PIR came under heavy German fire. When they finally reached the bridge over the Wilhelminakanaal at Son, it was blown up by the Germans. The engineers had to build a new bailey bridge suitable for heavy equipment as quickly as possible.
The 82nd Airborne Division also lost several Dakotas and gliders. They had to fly further over the Netherlands, resulting in the loss of a considerable number of Dakotas and gliders. James Gavin was still satisfied with the landing.
Strategic Error 4 – The bridge at Nijmegen should have been captured immediately
The division headquarters landed at Groesbeek without much trouble. The Waal Bridge turned out to be defended by a small number of Germans, while Model had forbidden the bridge to be blown up. James Gavin, however, let the chance to capture the bridge immediately go unused. Gavin decided to move toward the bridge only in the evening but now encountered a hastily assembled part of the 9 SS Panzer Division Hohenstaufen, called up by Bittrich. The bridge was not captured on the first day.
The British 1st Airborne Division landed around three in the afternoon at Heelsum and Wolfheze. The landing was perfectly executed, and there was almost no resistance. Yet, problems with the radio equipment arose immediately. There was almost no communication possible with the units and certainly not with the high command in England. The problem with the communication equipment had already been identified in England, but nothing further had been done about it.
Strategic Errors 5 and 6 – Wrong drop zones and faulty communication equipment
The British 1st Airborne Division was dropped much too far from the bridge at Arnhem. The landing zone was thirteen kilometers from the bridge and had to be guarded by one of the three brigades until the next day. Because the transport aircraft could only tow one glider, the Third Brigade would not be able to land until the next day. The element of surprise from the landing was thus completely lost.
Due to the poor radio contact, Roy Urquhart could not communicate with his units and decided to personally establish contact. Not such a good decision, as this meant the central command was lost. The 1st Parachute Brigade, the only brigade still available, led by Gerald Lathbury, failed to execute the advance quickly and efficiently.
The Germans reacted swiftly. Josef Krafft, with his 453 men, immediately took measures and blocked the central route to the east and, with a few mechanized guns, also closed off the northern route. The British largely ran into this defense.
The 2nd Parachute Battalion, led by John Frost, was more successful. Frost arrived around eight o’clock with the unit in the houses on either side of the northern approach to the bridge at Arnhem. Two attacks on the southern approach failed. A company of the 3rd Battalion joined Frost.
Operation Garden
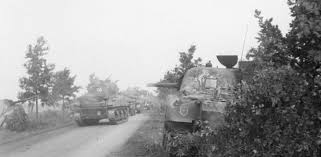
Operation Garden was the codename for the advance of the British XXX Corps from the south to Arnhem. Brian Horrocks gave the signal to open fire on the German positions. Keith Heathcote, commander of the leading tank unit, gave the advance order at 14:35. The Shermans, with infantry on the hulls, rolled forward at 12 km per hour on the only available highway. The troops had soon crossed the border.
The Plan
The XXX Corps had to advance via Lommel along the Eindhoven, Sint-Oedenrode, Veghel, Uden, Grave, Nijmegen, and Arnhem axis. On the first day, Eindhoven was to be reached by 17:00, Veghel by 00:00, on the second day Grave by 12:00, Nijmegen by 18:00, and on the third day Arnhem by 15:00. After that, they were to push through to the area around Nunspeet, then establish bridgeheads over the IJssel at Doesburg, Zutphen, and Deventer, after which they could immediately push on to the German Ruhr area.
Strategic Error 7 – A large Convoy on a narrow road, without adequate flank defense
The entire long column of vehicles and troops had to cover the distance to Arnhem on this narrow route. Friedrich Paulus had already learned during the Battle of Stalingrad that support for the flanks was of crucial importance. When the Russians realized that the defense of the flanks was minimal, they managed to encircle and trap the main force with a flanking movement. The Allies could have learned from this.
The flanks were additionally secured by the British 8th and 12th Corps, but it was very simple for the Germans to halt the advance several times. The Germans let the first tanks pass, then opened fire on the leading tanks. Within minutes, nine tanks were out of order. The convoy had to stop and the damaged tanks were pushed aside. It took several hours to roll up the German positions. The planned 2 to 3 hours to reach Eindhoven failed; by evening, Horrocks was only halfway. The convoy had to stop because the bridge at Son had not yet been repaired.
The next day, September 18, the XXX Corps began advancing at 10:00. Eindhoven was reached at 17:30, after which they continued to Son, where work began in the evening on building a bailey bridge. The corps was now a full day behind schedule.
Strategic Error 8 – Attacks from the flanks
From occupied Netherlands, German troops could be brought in from the west and north to attack the flanks of the convoy. All this took place on the left side of the British advance route. On the right side, the German Reichswald was within short distance, and from the east, the necessary German reinforcements were also brought in unhindered.
Strategic Error 9 – Gustav von Zangen and the 15th Army
Since the Allies’ attention was no longer focused on Walcheren and Zeeuws-Vlaanderen, Gustav von Zangen and the 15th Army were able to withdraw to Breskens and eventually cross the Westerschelde, retreating behind the Festung Schelde Süd. The British commanders were aware of this but initially did not take the evacuation seriously. It was not until September 9 that it became clear that large numbers of troops and vehicles had been ferried across. 86,000 men, 6,222 vehicles, 6,200 horses, and 6,500 bicycles were transported using existing ferry services and additional ships from the Netherlands. This evacuation, led by Hermann Knuth, was considered a victory by the Germans and contributed to “Das Wunder im Westen.” There was no question of ignorance on the part of the Allied high command. The intelligence service was well informed, and the Zeeland resistance had also provided an accurate picture of the German troops present. Von Zangen was now able to move through occupied Netherlands to the east and go to the aid of the troops there.
From September 18 to 26, many things happened—too many to describe in detail. Below are the most important moments.
Chaos on september 18
That afternoon, there was a second major landing at Son. The German counterattack began with an attack on Veghel. Meanwhile, the Americans in Eerde were shelled by the Germans. Kurt Student threw more and more smaller units against the flanks of the convoy.
A new unit, Panzerbrigade 107, was unloaded from a train convoy from the Reichswald near Venlo. In the evening, the German tanks reached Nuenen.
The 82nd Airborne Division, meanwhile, tried to capture the Waal Bridge at Nijmegen, but all attempts failed.
The Germans had sent the 406th Infantry Division from the Reichswald to Groesbeek. German attacks were halted, but they still threatened the landing area where that afternoon a around 400 gliders landed with supplies and 30 pieces of artillery.
At Niftrik, there was heavy fighting for the rail and road bridge over the Maas.
John Frost’s troops fought a fierce battle at the bridge in Arnhem to hold the bridge. Attack after attack by the Germans was repelled.
On the Ginkelse Heide, around 14:00, the heavily delayed 4th Parachute Brigade, led by John Hackett, landed in the middle of a battle.
In the northwest, a German unit attacked, partly consisting of Dutch SS members. In the southwest, Kampfgruppe West, led by Hans von Tettau, advanced. At this point, German troops were continuously arriving, withdrawn from the navy and occupation units of Holland. The descending gliders and paratroopers came under fire. A tenth of the 4th Parachute Brigade was eliminated.
The rest of the British 1st Airborne Division tried to reach Frost’s men but could not break through the tough German resistance. Roy Urquhart, meanwhile, was hiding in an attic without communication equipment and was unable to perform his command duties.
September 19, the chaos continues
The day started positively. The engineers had built a bailey bridge at Son, and immediately the convoy was set in motion and reached the 82nd Airborne Division at 11:00.
British tanks reinforced the canal bridge at Veghel, recaptured the road bridge at Niftrik, and drove on to Nijmegen, where to their astonishment they discovered that the road bridge had still not been captured.
In Arnhem, the day was catastrophic. Two battalions tried to break through in a night attack but were almost completely destroyed. The 4th Parachute Brigade tried to reach the north side of the bridge but encountered Kampfgruppe Spindler. With heavy losses, the attempt had to be abandoned.
The northern drop zone was lost just as part of the Polish brigade landed in gliders with anti-tank guns. Both the equipment and the dropped supplies fell into German hands.
Frost’s battalion ran out of ammunition. They hoped to be relieved by a planned Polish landing, but this was delayed due to bad weather.
Eindhoven was still not safe. In the evening, the Germans bombed the city center and destroyed a British ammunition transport.
September 20, more Chaos
First, some good news. The road bridge at Nijmegen was finally captured. Three hundred men of the 82nd Airborne Division managed to cross the Waal in boats. However, the boats had to be brought from Son, so the crossing could only take place in the afternoon. The Waal crossing is now considered one of the most heroic deeds by the American army. Tanks immediately stormed from the south bank and broke the German defense.
The road to Arnhem was now open, but to the Americans’ astonishment, Horrocks refused to advance immediately. But an immediate advance would have made little difference, as the Germans had recaptured the bridge at Arnhem. Frost was already almost out of water, food, and ammunition in the morning. Thirteen Tiger tanks could clear the bridge and cross. There was no defense left against them. Frost and his men, including the wounded, were captured by the Germans.
At Oosterbeek, the British and Germans were at a stalemate. Dropped supplies mostly fell into German positions. Due to the lack of radio contact, no air support could be provided.
Fighting continued at various locations, such as Eerde, Son, Mook, Dinther, and Heeswijk.
September 21, the Fighting Continues
The remnants of the British resistance at the bridge at Arnhem were cleared by the Germans. The bridge could now be used by the Germans to bring in reinforcements to stop the British ground troops advancing toward Arnhem. Radio contact with air support failed again. The British abandoned their breakthrough attempt.
The Polish brigade could finally land. The weather was still bad, and a significant part of the aircraft returned to England. Thus, only half of the brigade was dropped.
At Oosterbeek, the front line remained almost the same. Because most supplies were dropped on the Germans, food, water, and ammunition began to run out. They survived on rainwater.
September 22
The Poles had to stop the Germans but had hardly any boats at their disposal. Two amphibious trucks that were supposed to bring supplies got stuck in the floodplains. Still, 52 Poles were ferried across the Rhine in small rubber boats.
The German buildup at Schijndel was clearly visible. The Americans took action and recaptured the village. The Germans broke through the corridor at Mariaheide. British tanks hastily left Schijndel to save Veghel. The same happened with Uden, but the Germans took advantage of the confusion to recapture Eerde. The supply to Nijmegen was now seriously hampered. American truck drivers now called it Hell’s Highway. Helmond was liberated again by the 8th Corps.
September 23 – Doubt Sets In
The British had a chronic shortage of food, medicine, and ammunition. It was still impossible to properly coordinate the dropping of supplies. 90% fell into German hands. The transport aircraft were heavily fired upon by the Germans. On each mission, half of the aircraft were damaged. Soon, no more flights could be carried out.
The British high command wondered whether the operation should be continued.
At Nijmegen, the 305th Glider Infantry Regiment finally landed. The regiment could be used to protect Groesbeek. At the same time, half of the Polish brigade that had turned back on September 21, landed.
September 24
153 Poles managed to cross the Rhine.
Horrocks had been given carte blanche by the high command to decide the fate of the operation. He had probably already concluded that an evacuation was inevitable. Horrocks held a conference with all commanders at Valburg. According to the Poles, the British tried to blame the Poles for the failure of the operation. The actual situation made the Polish interpretation plausible. Further expansion at Oosterbeek was impossible due to direct German fire.
The fighting initially continued as usual. The Typhoons now effectively bombarded the German front troops, especially armored vehicles and artillery. Again, the dropped supplies fell into German hands. The arrival of the Poles did boost British morale.
In the afternoon, a ceasefire was agreed upon by mutual consent to evacuate the seriously wounded to Arnhem and Apeldoorn. Bittrich had agreed to this.
At the village of Koevering, a German battalion ambushed a British transport column and blocked the corridor for two days. The news of this attack was the death blow for the operation. Horrocks could now decide to evacuate the remaining troops without loss of face.
September 25 – The Start of the Retreat
All day, preparations were made to evacuate the troops from Oosterbeek. The Poles would be the last to cross to the south, after covering the British in their crossing. The wounded were left behind, cared for by medical personnel.
September 26 – The Retreat Continues
During the night, a large-scale evacuation took place (Operation Berlin). Under cover of heavy rain and intense shelling from Nijmegen, dozens of assault boats ferried back and forth to bring the approximately 2,400 men to the southern bank of the Rhine. However, there were too few boats, so not everyone could be transported in time. This mainly affected the Poles. Some soldiers did swim to the other side and drowned during the attempt. 2,163 men managed to cross the river, including four hundred glider pilots. At dawn, heavy German fire made further crossing impossible. The wounded were left behind with the medical personnel. The Germans took about six hundred men prisoner.
More than three-quarters of the British 1st Airborne Division had been destroyed.
In the south, the American 101st Airborne Division reopened the corridor. Arnhem was no longer the final destination; the new front line was at Nijmegen.
During Operation Pegasus I, with the help of the Dutch, 138 men were still brought to the other side of the Rhine. A second attempt, Pegasus II, failed. A German unit captured most of the participants. Many Dutch resistance members paid for the operation with their lives. Such large-scale evacuations were stopped. Individual Allies were smuggled to the south with the help of the resistance in the coming months.
Result
The fighting did not end with the evacuation of British troops on September 26. German and Allied units continued to battle for weeks, especially in the Betuwe region and around the Rhine. The Betuwe became a fiercely contested frontline area. The Germans launched several counteroffensives and local attacks to hold their positions and push back the Allies. Major battles took place around villages such as Elst, Bemmel, and Opheusden. In Opheusden, for example, the German occupiers began an offensive on October 4, 1944, to retake the village, leading to intense house-to-house fighting. There were also fierce battles and bombardments around Elst and Bemmel, where the Allies eventually drove the Germans out of the Over-Betuwe in October.
The entire Betuwe region turned into a no man’s land with heavy shelling from both sides, forcing the civilian population to evacuate. In December 1944, the Germans flooded much of the Betuwe to avoid an Allied attack. The fighting in the Betuwe continued until the liberation in April 1945.
How did the droppings of men and material go wrong so often?
On the very first day of the airborne landings, the Germans captured a British officer who was aware of the instructions for incoming transport aircraft. These instructions included details about the placement of landing markers (beacons) on the drop zones, as well as the use of flares and smoke signals. As a result, the Germans knew exactly how to use these markers. They were able to place the markers behind their own lines in the correct manner. In this way, the British Royal Air Force inadvertently supplied the Germans with weapons, ammunition, medical supplies, and food. The Germans enjoyed British corned beef, drank condensed milk, and tea with sugar. British cigarettes were also much appreciated.
Casualties
As always, various sources differ. More than 2,000 British and Poles were killed or missing. More than 6,000 British were taken prisoner, many of them wounded. Also, 4,000 Americans and 5,000 Germans were killed or wounded. Among the civilian population, there were 3,600 deaths due to the fighting.
Large parts of the Netherlands were thus not liberated. This led to the Hunger Winter in the west, with another 30,000 victims.
Aftermath
The American troops involved in Market-Garden, the 101st Airborne Division and the 82nd Airborne Division, remained in the Netherlands for the time being but were later, in December 1944, moved to the Ardennes to participate in repelling the German Ardennes Offensive.
The British 1st Airborne Division was almost completely destroyed and was later disbanded. Brian Horrocks’ XXX Corps withdrew to the southern bank of the Rhine and consolidated the line around Nijmegen.
The British remained responsible for the left flank of the Allied front in the Netherlands. The Battle of the Scheldt was mainly fought by Canadian troops, especially the First Canadian Army under Harry Crerar. The British played a supporting role.
The Canadians fought heavy battles at Breskens, Woensdrecht, and Walcheren. The 2nd Canadian Infantry Division and the 4th Canadian Armoured Division were crucial in clearing the Scheldt and the banks toward Antwerp.
The British task was to hold the line around Antwerp.
During the Ardennes Offensive, the British played a crucial role in the northern part of the front, around Aachen and Liège. Montgomery temporarily took command of the American 1st and 9th Armies in the north to halt the German advance. The British 6th Airborne Division and the 53rd Welsh Infantry Division were deployed to defend the northern flank of the German offensive.
The 1st Polish Armoured Division participated in the battles at Breda and Tilburg but was not directly involved in the Battle of the Scheldt.
Sources:
Wikipedia – Market-Garden
Een andere kijk op de slag om Arnhem – Peter Berends